Fujitsu FI-6130 setup
KB024 – Configuring the Fujitsu FI-6130 in Volume
1
Install the TWAIN interface driver that came with the Fujitsu scanner and then attach the scanner to the PC. Follow the scanner instructions on how to do this. Test the scanner is working in Windows.
2
Click on the New Page icon in Volume.

3
Select Scanner Setup.

4
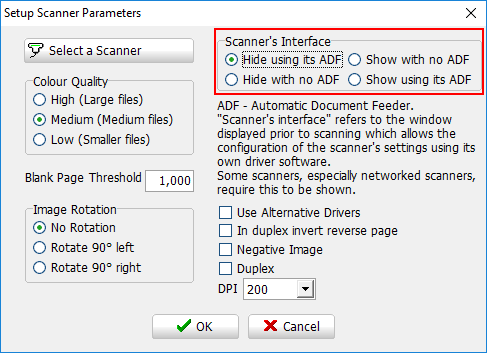
Select ‘Show using its ADF’ and then click ‘Select a Scanner’.

5
Select the Fujitsu driver ‘FUJITSU fi6130’. Do not select the Windows driver ‘WIA-fi 6130’. These Windows drivers usually start with WIA.

Once selected, click ‘OK’ in the ‘Setup Scanner Parameters’ window.
6
In the ‘New Page Entry’ window click ‘Scan’. This will show the Fujitsu scanner’s interface.

7
Click the ‘Option’ button to show the Option window.

8
Select the ‘Job/Cache’ tab and change ‘Multifeed Detection’ to ‘Check Overlapping (Ultrasonic)’. This will check for multiple pages being fed into the scanner at the same time.

Click ‘Scan’ to accept the changes and perform a test scan.
9
The Fujitsu scanner’s settings are currently set to show each time a document is scanned. To turn this off, go back to the ‘Setup Scanner Parameters’ window and set the Scanner’s Interface to ‘Hide using its ADF’.


